
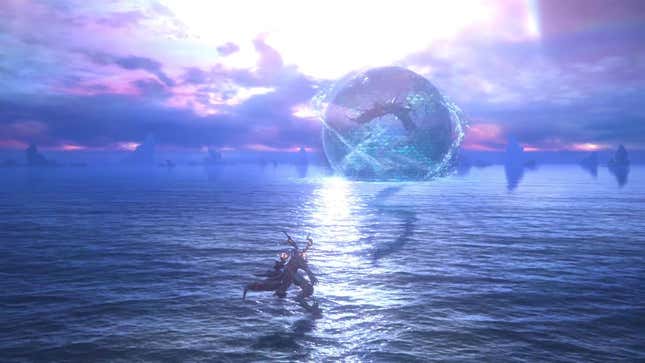
At the end of The Rising Tide DLC in Final Fantasy XVI, you’ll have to go toe-to-toe with Final Fantasy’s iconic sea serpent: Leviathan. Like its predecessor, Echoes of the Fallen, The Rising Tide is already more challenging than the base game, and Leviathan kicks the difficulty up yet another notch. Not only is this a four-phase boss battle, but you also have to use Ifrit throughout the entire encounter. This means there are no special builds you can use to cheese this one; it’s just you and your skills against the monster.
Fortunately, this fight is surmountable with a bit of patience and strategy. There are checkpoints for each phase of this encounter, and dying will replenish your stack of Firelights if you need extra healing. Also, Leviathan will repeat attacks throughout each phase, so you don’t have to memorize too much to make short work of the fish. Here’s what you need to do.
NOTE: This guide is based on the Final Fantasy mode version of the fight. However, the mechanics appear to be identical to those seen in Story-Focused and Action-Focused mode.
Phase 1: Through the Maelstrom
At the start of the encounter, Ifrit will be in freefall against Leviathan. You’ve seen this gimmick in other Eikon fights (namely Titan), so the same rules apply. Your movement is limited here, so use long-range magic attacks when Leviathan is far away and melee attacks once it enters into close range. Remember that of Ifrit’s two special moves, Spitflare is a long-range attack and Brimstone is a charged melee attack. This will become very important in phase 3.
You’ll predominantly rely on precision dodges to avoid damage, so learning Leviathan’s attacks is crucial. Leviathan won’t always use the same attacks in order, but it will almost always telegraph them in the same way throughout this phase. Here’s what to look out for.

One of the first main attacks Leviathan will use is telegraphed by its tail beginning to glow. It will spin around and try to whip you vertically, so you’ll want to time your dodge once Leviathan is upside down and about to smack you. See the above picture for reference.
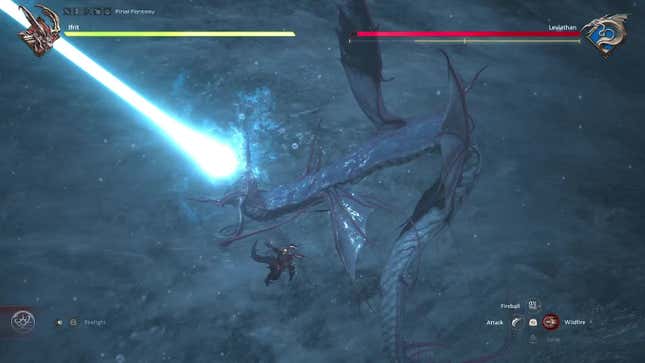
Leviathan will also spit a water jet from its mouth, starting at one end of the arena before twisting its head (and the beam) to the other side. To handle this, wait for its head to begin turning, and dodge roll into the beam. This will give you a generous window to land a precision dodge and avoid damage.
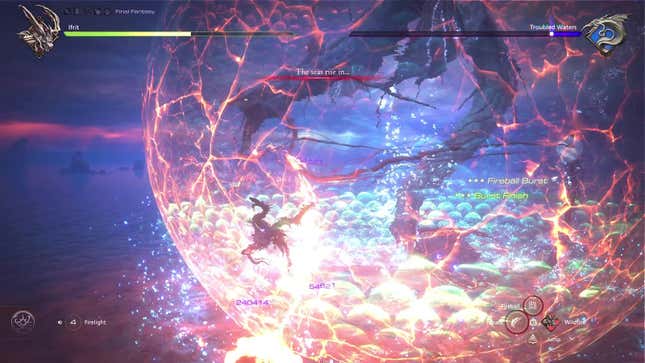
Fortunately, Levithan’s other attacks will be called out with ability names. When Leviathan casts Riptide, rings of water will appear around Ifrit that will damage him on contact. After about two seconds, the rings will close in on Ifrit. Similar to the water jet, wait for the rings of water to close in, then dodge in any direction to pull off a precision dodge.
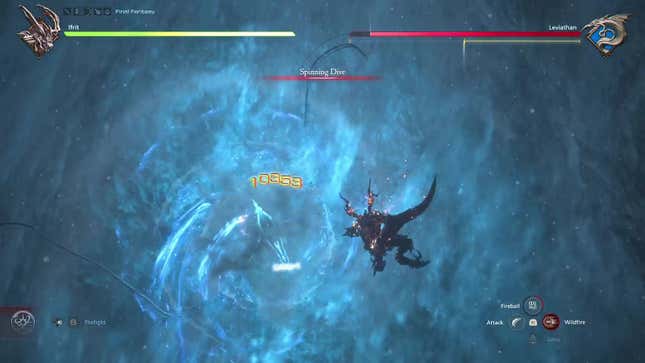
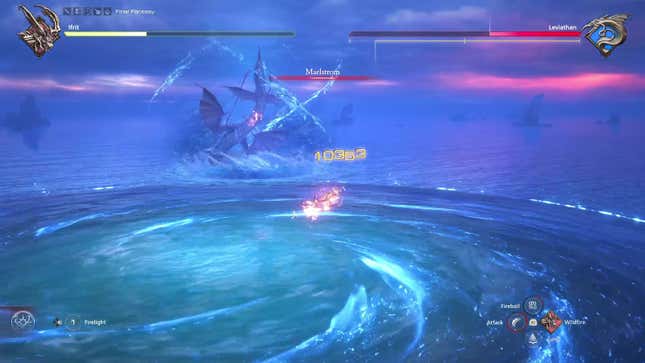
Spinning Dive is a similar story, but it’s a bit trickier since the attack will go off only a second after the name appears on the screen. Fortunately, you can predict when it’s coming, since Levithan will swim into the wall of the waterspout before using it. The water will start to glow, and then you’ll want to dodge right when Leviathan’s head appears out of the water. There will be a loud splashing sound when Leviathan emerges, so you can use that as a cue for when to dodge.
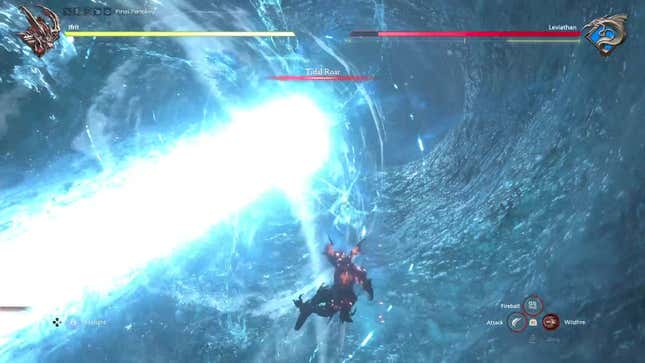
The other two named attacks are long-range, which makes them a bit easier to handle. The first of these is Tidal Roar, in which Leviathan will telegraph a huge AoE before blasting it at you. While this seems to cover the entire arena at a glance, the sides are safe spots as long as you don’t accidentally tiptoe into the attack. Use Wildfire to get out of the way, and use ranged attacks to get some free hits in.
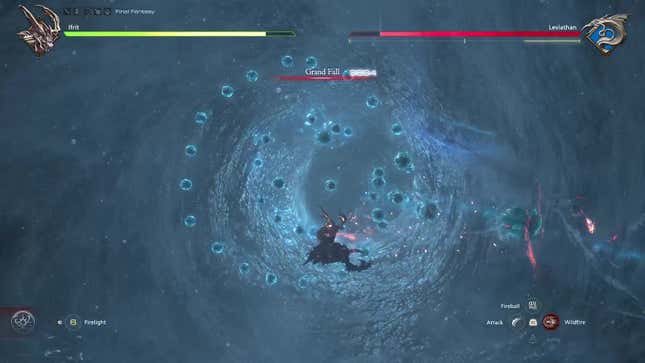
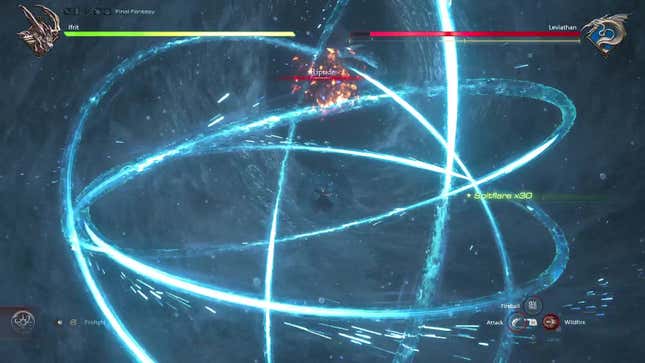
When Leviathan uses Grand Fall, several water orbs will appear in a spiral. Each orb will flash before zooming at whatever location you were in at the time they light up. There’s honestly not much to say here; zip around the arena to dodge the orbs, and time your dodges whenever any orbs get close. You can chain precision dodges one after the other here, but you can get unlucky and have an orb hit you right when your invulnerability frames wear off, so be careful.
Note that these water orbs will be a recurring attack throughout all phases of this fight. Even in Phase 1, Leviathan can shoot groups of water orbs at you without using Grand Fall. But regardless of the situation, remember that they’ll flash before shooting toward you. Time your dodging accordingly.
Attacks will repeat from here, so just keep dodging and inflicting damage in any safe openings you can find. Once Leviathan reaches about 75% HP, a cutscene will play which will launch you into Phase 2. There is a cinematic dodge to pull off here, so press R1 at the prompt during the scene.
Phase 2: Surging tides grow bold
Fortunately, the remaining phases of the fight will put Ifrit on a proper battle arena instead of the more limiting freefall of Phase 1. What’s more, you’ll start to see attacks from Phase 1 repeat here. Since you can dodge most of them in much the same way as you did before (with one slight exception), I won’t cover each move in detail. However, if you didn’t nail the dodge timing before, you now have a lot more wiggle room to just Wildfire out of the way of any attacks you see coming.
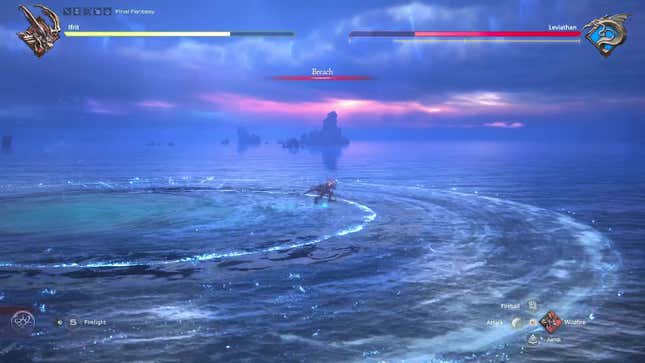
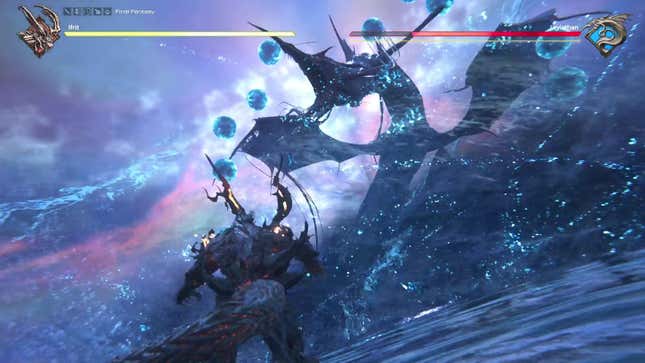
One of the central new attacks to watch out for is Breach. Leviathan will dive into the water before the attack name will appear, and a wide area of effect marker will be telegraphed around Ifrit. To dodge Breach, immediately use Wildfire to get out of the circle. The timing on this is tight, so you’ll have better odds of dodging if you start moving once Leviathan enters the water. I wouldn’t recommend trying to precision dodge this one, but if you can do it, knock yourself out!
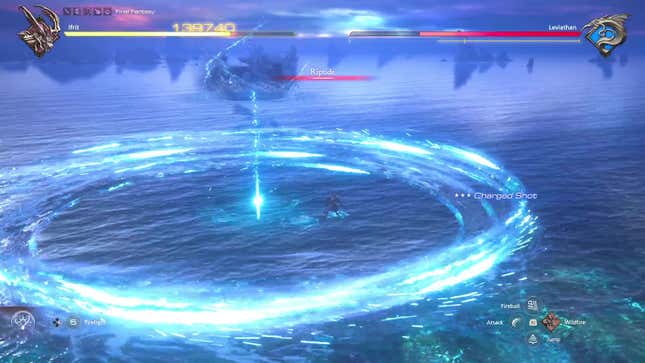
Breach is not to be confused with Riptide, which reappears from Phase 1. However, the rings of water will appear in a way that looks similar to Breach at a glance, so make sure you notice the difference. That said, you can dodge Riptide in the exact same way. Wait for the rings of water to close in, and dodge into them to perform a precision dodge.
As another visual clue to differentiate between Breach and Riptide, note that Leviathan will be out of the water for Riptide, unlike the dive that precedes Breach.

Salt Spray is technically a new attack, but this is similar in concept to Grand Fall from Phase 1. Orbs will appear in front of you, and they’ll fly at you after they individually flash. Nothing new to cover here, you have so much free space to dodge this one that you can honestly wing it.
As far as I can tell, Leviathan doesn’t have a specific HP checkpoint that triggers the next phase (I’ve had its health bar above and below 50% when the transition occurs). However, you’ll certainly know when the next phase begins, because it’s time for…
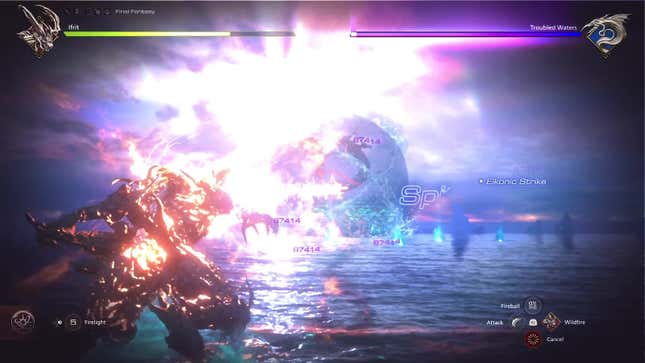
Phase 3: The DPS Check (Troubled Waters)
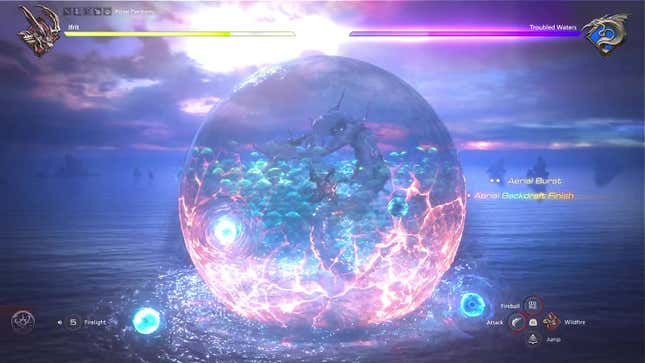
After a short cinematic plays, Leviathan will cast Troubled Waters, creating a shield around it. Like other shield phases from the main game, your goal is to shatter it within a (mostly) invisible time limit. You have approximately two minutes, and you’ll only know you’re running out of time when you see the words “The sea rises in…” before a five second countdown.
While you do need to worry about attacks from Leviathan here, there aren’t any complex mechanics to deal with. To inflict as much damage as possible, use the following strategies:
1: Use your Spitfire ability ASAP. Since it’s a ranged attack, you can whack Leviathan with this right at the start of the phase as long as it’s off cooldown. Using Spitfire early means it cools down sooner, letting you potentially sneak in an extra cast before you run out of time.
2: From there, spam Wildfire to get into melee range of Leviathan. You’ll have to contend with some basic attacks here, including some water spurts and more water orbs that behave like Salt Spray and Grand Fall earlier. You can skirt around these without too much trouble, though you may need to precision dodge the water orbs as you close in. Don’t try to brute force this part and eat unnecessary attacks.
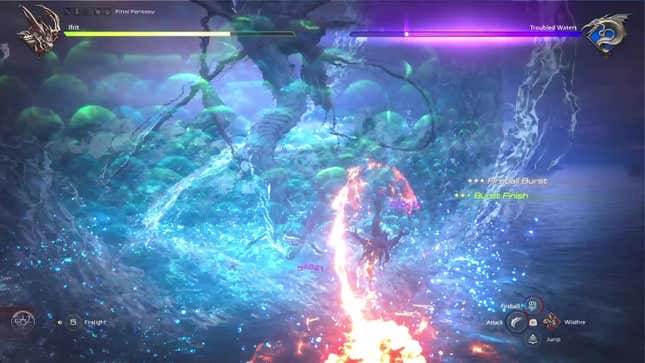
3: Once you’re in melee range, charge up and use the Brimstone skill immediately. If both special moves are cooling down, spam Ifrit’s basic combo of Square-Square-Square-Triangle to end your attacks with a burst finish. This will bounce Ifrit into the air, but you can keep repeating the combo while airborne, so don’t bother waiting for Ifrit to land. If Ifrit’s combo string pushes him away from Leviathan, just Wildfire or dodge back into melee range and keep the pressure on.
4: Leviathan will continue to use basic water orb and water burst attacks while you’re in melee range. Again, do not try to brute force and eat these hits, since you’ll wind up inflicting less damage while you recover from the knockback. Taking a second to dodge at just the right time is worthwhile, so don’t get too stressed about the time limit here. If you can pull off a precision dodge, you can chain right into a precision counter that will inflict boosted damage (nearly on par with a three normal melee attacks).
5: After enough time in melee range, Leviathan will glow as the water underneath it ripples. This means it’s casting a knockback ability that will create distance between you and the boss again. This is a relatively long cast, so just keep dealing as much damage before the ability goes off. It inflicts no damage, so don’t worry about dodging anything here.
6: To sneak in a little extra damage, you can charge your magic by holding Triangle while the knockback animation plays. This will let you sneak in a charged shot as soon as you regain control.
7: Repeat the above steps, since there are no new mechanics to learn. Use Spitfire regardless of range, close distance with Wildfire, and keep comboing Leviathan while using your abilities as soon as possible. You’ll see one more knockback cast before the phase ends, so brace yourself for that as you pile on the damage.
Make no mistake, this is a tight damage check, especially on Final Fantasy mode. However, it does not require perfect play, especially if you follow the steps above. If you slip up along the way, just keep fighting. You’ll get it eventually, and you can keep practicing thanks to the fight’s generous checkpoints.
Once you shatter the shield, Leviathan will be staggered. Take advantage of this opportunity, since this is all free damage you can inflict before the next phase begins. If you happen to have abilities off-cooldown, make sure to use them now while you can stack up damage multipliers!
Phase 4: Seething currents whorl
After Leviathan recovers from stagger, it will roar and immediately cast Maelstrom. This functions kind of like a mix of Breach and Riptide from Phase 1. A large area of effect will spawn around Ifrit, and after about a second, the water will flash and begin to close in towards the center. This attack is very tricky to dodge, as Ifrit will be pulled toward the center and will take damage once it starts to close in.
The most consistent strategy I found here was to jump away from the center, use Wildfire in midair, and time a dodge at the water’s edge. If done right, you’ll avoid all damage. However, even if you flub it a bit, this move deals enormous damage if you’re close to its center when it resolves. So, at the very least, you should mitigate some damage by attempting to escape. Make sure to use Firelight if you need healing!

The remainder of this fight uses many of the mechanics seen in Phase 2, albeit much more aggressively. You will see a new iteration of Riptide appear here, in which Leviathan will scatter several rings of water around the arena. Fortunately, this move looks scarier than it is. Focus on the rings that Clive is inside of, and dodge into them once they begin to close in. Just one well-timed dodge can resolve this entire attack, but you may need to chain into another dodge depending on the ring placement.
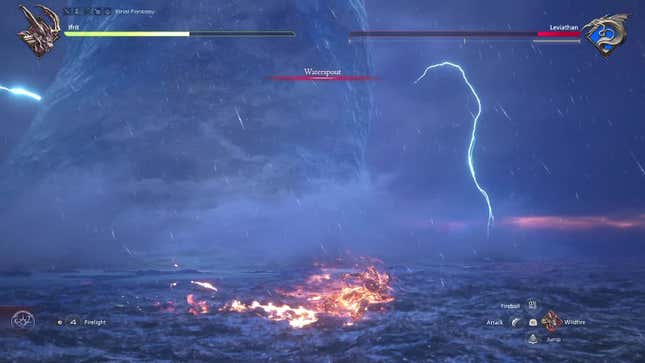
You’ll see a cinematic play as the fight progresses, which is an elaborate telegraph for the move Waterspout. This will summon a massive tornado that fills up nearly the entire screen, and it will inflict enormous damage if it connects. Fortunately, this attack moves in a set trajectory that won’t necessarily follow Ifrit. Spam Wildfire to move either left or right to get out of the way of the attack.
After Waterspout, Leviathan will move immediately into Angry Seas. Despite the new name, this attack is predominantly a rapid string of its previous named moves used in rapid succession. The only tricky part is that the individual moves won’t be identified by their names, since this entire sequence is labeled as “Angry Seas.”
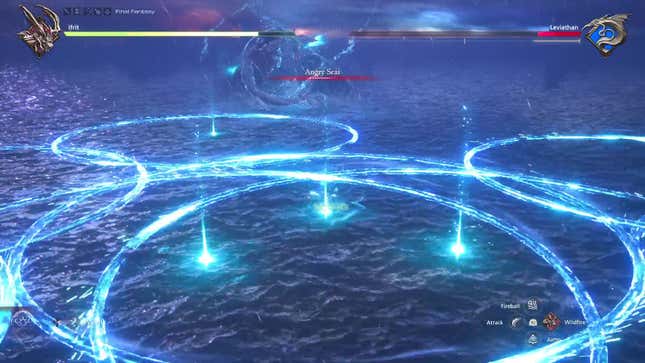
Fortunately, this move appears to follow a set series of mechanics, so you can predict each section if it helps. Angry Seas consists of Riptide three times, Maelstrom, Salt Spray (from behind Ifrit in my testing), Waterjet, Salt Spray (in front this time!), and Tidal Roar. This is the first you’ve seen Tidal Roar since Phase 1, but you can dodge it in the same way you did before. Just make sure you’re outside of that wide area of effect marker in the water.
Angry Seas is a very long attack, so try to spam Triangle to keep shooting magic at Leviathan while you dodge. With any luck, you might break Leviathan’s stagger bar again and interrupt the onslaught.
After Angry Seas resolves, you’re in the home stretch for this encounter. Keep piling on damage, and once Leviathan only has a small bit of its health remaining, it will warp away from you and summon a huge Tsunami. This is the end of the fight, so mash the Square button at the prompt during the cutscene and enjoy the pretty ending cinematic. Congratulations on clearing the main story of The Rising Tide!
Source link


